Software Overview:
This is an overview of Pix4D Software. Pix4D is an image processing software that is a complete mapping and modeling solution to convert thousands of images into georeferenced 2D mosaics and 3D models.
Ground Control Points (GCPs) are required in order to take then into account for reconstruction, they should also be clicked in at least 2 images each. It is recommended that use of at least 5 GCPs. GCPs are needed if you want take account for them in the reconstruction and should be clicked in at least 2 images each. GCPs are highly recommended when processing images with no geolocation. If you do not use GCPs the final results will have no scale or orientation and absolute position information. They then cannot be used for measurements, overlay and comparison with previous results. Although GCPs are not required for processing a project, but they significantly increase the absolute accuracy of the project.
Pix4D mapper can process projects with or without GCP's. GCP's make the project globally more accurate.
Ways Ground Control Points can be used:
Measured in the field with topographic methods. This is not recommended. If no GCP's are used the final results will have no scale, orientation and absolute position information. They cannot be used for measurement, overlay or comparison with other or previous results.
Topographic Equipment
Total Station Accuracy: They can reach millimeters accuracy (depending on he distance of he measured points from the station.
GPS system accuracy: They can reach several centimeters accuracy (depending on the equipment, the area and the country.
Taken from existing geospatial data:
Web Map Service (WMS) servers are a good alternative when GCP's are not available. The map servers provide online georeferenced maps using a standard protocol. Some providers provide this free of charge. Google and Bing Maps are examples. Some of the accuracy of the WMS may be low. It is not recommended to use them for projects that require higher accuracy. It is necessary to adjust the accuracy of the GCP's in the GCP/Manual Tie Point Manager. On the Pix4D software manual there are specific instructions on how to do his for Google Maps, Google Maps Sandbox or Daft Logic, simply follow the directions if this is what you would like to do.
There are 3 methods in which to use GCP's in a project.
Method A: This method is used when the image geolocation and GCP's have a known coordinate system that can be selected from the Pix4D mapper's data base. The two systems do not need to be the same coordinate system as Pix4Dmapper. Pix4D is able to do the conversion between the 2 different coordinate systems.
The output coordinate system does not need to be the same as the images coordinate system or as the GCPs coordinate system. It is recommended that the output coordinate system is the same as the GCPs coordinate system.
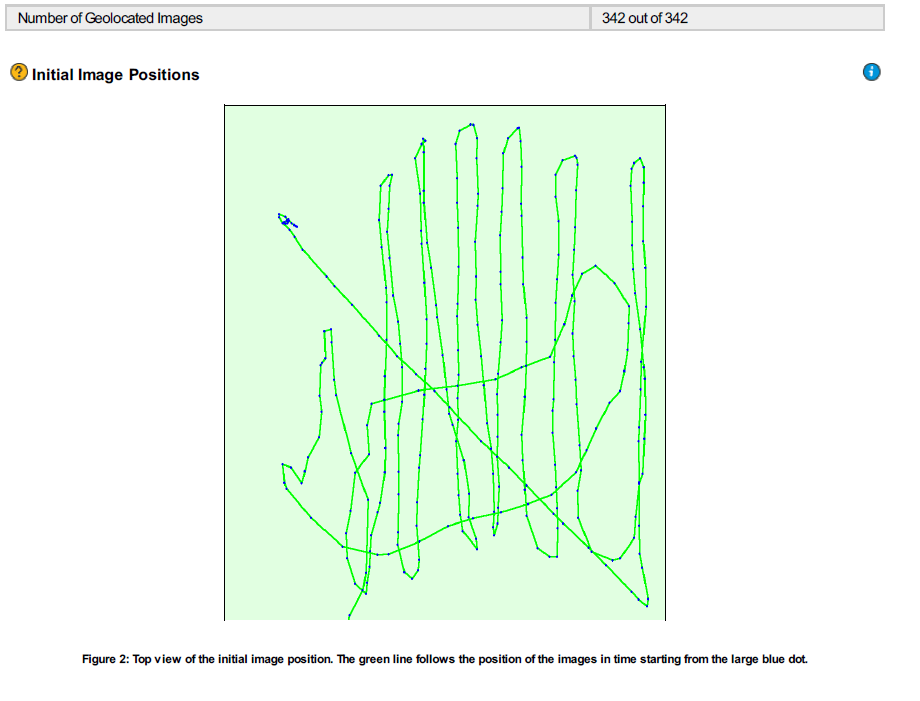
The below figure is an image of the imported SX260 images. There were a total of 342 images taken with the default coordinate system of WGS84 and was changed to NAD83 UTM Zone 15N for the sake of limiting distortion.
 |
| Figure 1: This is the path used for the mission and the dots are the areas in which the pictures were taken. |
Part 2:
NAD83 UTM Zone 15N is the coordinate system being used in this output.
This is the most common case, it allow you to mark the GCP's on the images with little manual intervention. However, this method is not suited for over night processing where the different processing steps are started automatically in a row and do not require supervision from the user.
 |
Figure 1: This is an example of how Method A would work.
|
Method B: This method can be used for the following cases:
The initial images are taken without geolocation: When no GPS was used and no coordinates were given to the center of the images, the CP.s can be in any coordinate system.
The initial images are geolocated in a local coordinate system, this is common when dealing with terrestrial imagery or when reconstructing small objects. The GCP's can be in any coordinate system.
The GCP's are in a local coordinate system, the coordinate system from the image geolocation is no relevant.
This will allow you to mark GCP's on the images with little manual intervention when the images are not geolocated or when the images or GCPs are geolocated using the a local system. This method as well as Method A, is not suited for over night processing where the different processing steps are started automatically in a row.
 |
Figure 2: This is an example of Method B and how it would work.
Method C:
This method works for any case, no matter the coordinate system of the images or GCPs but it requires more time to mark the CPs on the images. This method has it advantages, after importing the images and the GCPs the processing can be done without any intervention from the user. It is the best choice for "over nigh processing" but it requires more manual intervention to make the GCP's on the image.
I chose to use Method C for my analysis. In Pix4D we uploaded the photos and obtained the GCPs measurements in the field or through other sources, add or import all the GCPs, you need to go to the GCP Editor, then go to each individual image and find the center of the GCP, and mark it manually. Once you are done with marking each one individually, click OK and close the editor. Then you are ready to process. This was done on an over night basis, once the process started the computer was locked and all the information was retrieved in the morning.
Figure 3: This is Method C, this was the method selected.
Figure 4: GCP/Manual Tie Point Manager before GCPs were added.
This GCP Tie Point Manager shows each GCP and its Latitude, Longitude and Accuracy of both vertical and horizontal. In order to compute the 3D position of the GCP/Manual Tie Point, it needs to be marked on at least two images. In order to take the GCPs into account for georeferencing the project, at least 3 CPs need to be marked. After marking the GCPs the initial process requires the user to run Process>Reoptimize. This will give you the results with the added GCPs.
The initial processing was about 40 minutes and then we realized that we had not added the edits to the GCPs and we did the process over and edited he GCPs. The second processing took about the same time.
Below is the quality report for processed. This report is without using GCPs. In the Quality Check area below, there is the Georeferencing area that shows no 3D GCPs.
This image shows that the image overlap is very good. This will produce good results.
|